How to remove mtb cranks?

How to combine a red shirt?
March 27, 2022
How far can you ride a cruiser bike?
April 5, 2022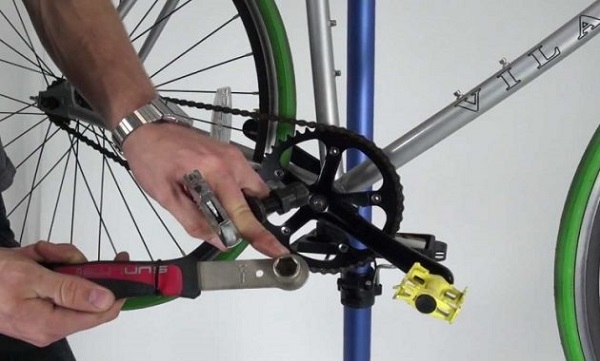
Using the right mtb cranks is crucial to keeping your bike efficient and safe. These bits are often overlooked because they are considered ‘extra’ parts, but they are an important part of your drivetrain that can cause serious damage if not maintained properly. This article will show you how to change out your cranks and also how to prevent them from seizing up again.
How to remove mtb cranks?

One of the most important things to note when removing your cranks from mtb’s is that you’ll have to remove a bolt on the crank, called either “pigtail” or “stay tight,” in order for the bike to be safe enough for transport. The pigtail bolts can be removed with simple 7/8 inch socket wrench force, but if grabbed too firmly by the hand, it may crack after prolonged periods of disassembly! Continue reading: Schwinn mountain bikes
Tools needed: 3/8 hex driver, 1-5/32″ ratchet and extension, 3mm Allen key.
Step 1: First, remove the skewer and chain guard. You may have to pull it off with pliers if you rifle a crank or bearings that spin the chain off the grip. If so, take your time now (in order) to put the sprocket back on – this makes removing the cranks much easier in general! Keep reading https://pluginid.com/how-to-clean-a-mountain-bike/
Step 2: Remove pigtail bolts from both sides of the frame until they fall out of hard-to-reach areas. Inspect condition of leverage and bolts. If significant damage is visible, it may be time to take your bike in for STD repair before replacing the cranks!
Step 3: Remove bearing cup screws with a hex key – these are easy to overlook on some bikes (it’s always cramped under there, so they easily get rattle-easily loose), but if you remove early enough. With small head force, this won’t damage your bearings!
Step 4: Remove all bearings, top cap screws and bottom plate bolts. A pair of needle-nose pliers will work fine for this (I use “Crook n Rose Gold” pliers).
Step 5: Remove the bottom plate and bearings, keeping them out of the grime! You’ll be spraying some degreaser on them soon anyway, so cleanliness is nice too.
Step 6: Clean up cranks removing any dirt or grease from crank rolls (grease will only make your bike overly-lubricated and support weak freewheeling). Pay attention to coating all bearing balls in grease as these can tear off, especially if you have an issue.
Step 7: Re-grease rollers, bearing balls (not rings) and key bolts with a small amount of 5w40 grease. If you are feeling anal about it, use a thread locker on the crank spindle if appropriate (fully prepped frames will always have some versionS, though). I’ve heard that PB Blaster can be used for similar purposes – your call, really! Cover in grease!
Step 8: Install crank spindle assembly on cranks. These are trickier to install than they seem at first glance. I did it wrong in my inexperience years ago and broke a crankset. I almost never brake with these today! It is important to use your judgment here when applying torque (lower one number means more). Suppose you make an error take the set of cranks off and start over with a new set. This spindle is usually well threaded, so you can torque until the end plate wears through if desired (it’s not something I’ve done in years).
TIP: If you are doing your frame properly – don’t let bottom bracket rings interfere with crank axle adjustment. Otherwise, they will have to be removed before installing these guys as it’s very difficult to get access without taking them out! With some spray-on lube applied to the spindle and crank axle, you can get a little more access to this.
Step 9: Fully pre-install cranks into the frame for the first time since the completion of the assembly process. ALWAYS work in small sections at once! Restarting your bike after adjustment (especially on new carbon frames or with slip fit bottom brackets) is painful, so don’t re-start if you simply need one side one way or another. I like to avoid the granny ring gear suburb and spin on my half cranksets for acclimation purposes if I haven’t ridden them in a long time.
TIP: If you want an even easier installation – use zip-ties around your crank arm gusset to hold precut ends into place so that they can slide freely, but this will require some heat from a torch or welder as there is no weldable ring for the method.
Step 10: It does look a funny way to install but make sure that chainring bolts are against the inside face of the bottom bracket spindle and it will be less likely you over tighten them! I use zip ties when available – some welder goofs do this easily by just welding rings into place from inside or cutting small sections out of faces as well as weld in Torx bolt anchor holes with brazed inserts.
TIP: If you are doing your frame properly – make sure to closely inspect the bottom bracket spindle at this time as a small burr is formed on the whole plastic trim rings if one side or another needs adjusting. This will chip off quite easily with finish spray lube – very difficult to re-fix without being able to remove crank arms first in many cases!
What to use instead of a crank puller?
Next up – bottom bracket removal and installation. After the careful choice of crank type, there are several ways to remove this hands-free:
- Using special Grips: ‘Hub pullers’ that you can use in the same way as “traditional” hub grinders save your arms! Don’t try it if water has passed between the original setting the first time with new carbon blades or after removal while they were covered in burrs from disk grinding on a disk brake rotor!
- Crank puller: A single attachment tool that fits several crank arm lengths to fit many different crankset cases, but it takes some extra time and effort. If you have no choice, try not to start bending things before pulling the chain, right? I personally just do all this with ordinary hand levers (Chinese wrench in 1/3 left position), but it still is done by tightening until it gradually works – very easy to get a bent chain reinstalled, twisted or broken.
- A good way to predict difficulties is testing the strength (applied to crank) – very hard figure off after hours of work by stepping in between rebuilt chains, or simply see what they can hold on one chain while replacing with plan replacement! Signs have been great successes but also many moments of repeated failure as removing cranksets all the wrong time.
Cranks are the most common type of bottom bracket spindle used in modern bicycle frames. They can be made from a variety of materials, including steel, aluminum, titanium and carbon fiber.

